上一篇[[ReentrantLock详解(一)—— 加锁和解锁]]讲了ReentrantLock的基本使用,和比较基础的加解锁原理以及流程。本文来继续讨论剩下的一些比较重要的部分。有:
公平锁和非公平锁的实现区别;
绑定条件阻塞和唤醒的实现,解析AQS中的ConditionObject;
1. 公平锁和非公平锁 ^b9c966
ReentrantLock在创建的时候,可以指定其是否为公平锁。默认为非公平锁(非公平锁的性能相对较高),构造函数传false则为公平锁。
1
2
3
public ReentrantLock (boolean fair) { sync = fair ? new FairSync () : new NonfairSync (); }
两者大部分实现都是一致的,只有在加锁的时候略有区别。源码如下:
1.1 公平锁 1 2 3 4 5 6 7 8 9 10 11 12 13 14 15 16 17 18 19 20 21 22 23 24 25 26 27 28 29 30 31 32 final void lock () { acquire(1 ); } @ReservedStackAccess public final void acquire (int arg) { if (!tryAcquire(arg) && acquireQueued(addWaiter(Node.EXCLUSIVE), arg)) selfInterrupt(); } @ReservedStackAccess protected final boolean tryAcquire (int acquires) { final Thread current = Thread.currentThread(); int c = getState(); if (c == 0 ) { if (!hasQueuedPredecessors() && compareAndSetState(0 , acquires)) { setExclusiveOwnerThread(current); return true ; } } else if (current == getExclusiveOwnerThread()) { int nextc = c + acquires; if (nextc < 0 ) throw new Error ("Maximum lock count exceeded" ); setState(nextc); return true ; } return false ; }
1.2 非公平锁 1 2 3 4 5 6 7 8 9 10 11 12 13 14 15 16 17 18 19 20 21 22 23 24 25 26 27 28 29 30 31 32 33 34 35 36 37 38 39 40 @ReservedStackAccess final void lock () { if (compareAndSetState(0 , 1 )) setExclusiveOwnerThread(Thread.currentThread()); else acquire(1 ); } @ReservedStackAccess public final void acquire (int arg) { if (!tryAcquire(arg) && acquireQueued(addWaiter(Node.EXCLUSIVE), arg)) selfInterrupt(); } protected final boolean tryAcquire (int acquires) { return nonfairTryAcquire(acquires); } @ReservedStackAccess final boolean nonfairTryAcquire (int acquires) { final Thread current = Thread.currentThread(); int c = getState(); if (c == 0 ) { if (compareAndSetState(0 , acquires)) { setExclusiveOwnerThread(current); return true ; } } else if (current == getExclusiveOwnerThread()) { int nextc = c + acquires; if (nextc < 0 ) throw new Error ("Maximum lock count exceeded" ); setState(nextc); return true ; } return false ; }
1.3 区别 ^608e2b
公平锁和非公平锁有两处不同:
非公平锁在调用 lock 后,首先就会调用 CAS 进行一次抢锁,如果这个时候恰巧锁没有被占用,那么直接就获取到锁返回了。
非公平锁在 CAS 失败后,和公平锁一样都会进入到 tryAcquire 方法,在 tryAcquire 方法中,如果发现锁这个时候被释放了(state == 0),非公平锁会直接 CAS 抢锁,但是公平锁会判断等待队列是否有线程处于等待状态,如果有则不去抢锁,乖乖排到后面。
公平锁和非公平锁就这两点区别,如果这两次 CAS 都不成功,那么后面非公平锁和公平锁是一样的,都要进入到阻塞队列等待唤醒。
相对来说,非公平锁会有更好的性能,因为它的吞吐量比较大。当然,非公平锁让获取锁的时间变得更加不确定,可能会导致在阻塞队列中的线程长期处于饥饿状态。
2. Condition Condition主要用于生产者-消费者的场景中,如下例子:
1 2 3 4 5 6 7 8 9 10 11 12 13 14 15 16 17 18 19 20 21 22 23 24 25 26 27 28 29 30 31 32 33 34 35 36 class Plate { private Object[] record; private final ReentrantLock lock = new ReentrantLock (); private final Condition notFull = lock.newCondition(); private final Condition notEmpty = lock.newCondition(); private int idx = -1 ; public Plate (int capacity) { record = new Object [capacity]; } public Object take () throws InterruptedException { lock.lock(); Object res; try { while (idx == -1 ) notEmpty.await(); res = record[idx--]; notFull.signal(); } finally { lock.unlock(); } return res; } public void put (Object obj) throws InterruptedException { lock.lock(); try { while (idx == record.length - 1 ) notFull.await(); record[++idx] = obj; notEmpty.signal(); } finally { lock.unlock(); } } }
接下来对Condition进行分析。
2.1 从创建Condition开始 每个 ReentrantLock 实例可以通过调用多次 newCondition 产生多个 ConditionObject 的实例:
1 2 3 4 5 6 7 public Condition newCondition () { return sync.newCondition(); } final ConditionObject newCondition () { return new ConditionObject (); }
可见创建的是AQS中的 ConditionObject。接下来看看它的结构:
1 2 3 4 5 6 7 8 9 10 11 12 13 public class ConditionObject implements Condition , java.io.Serializable { private static final long serialVersionUID = 1173984872572414699L ; private transient Node firstWaiter; private transient Node lastWaiter; public ConditionObject () { } }
首先看到其维护了两个Node节点,分别是firstWaiter和lastWaiter。此时再回忆一下Node的结构。
1 2 3 4 5 6 7 8 static final class Node { volatile int waitStatus; volatile Node prev; volatile Node next; volatile Thread thread; Node nextWaiter; }
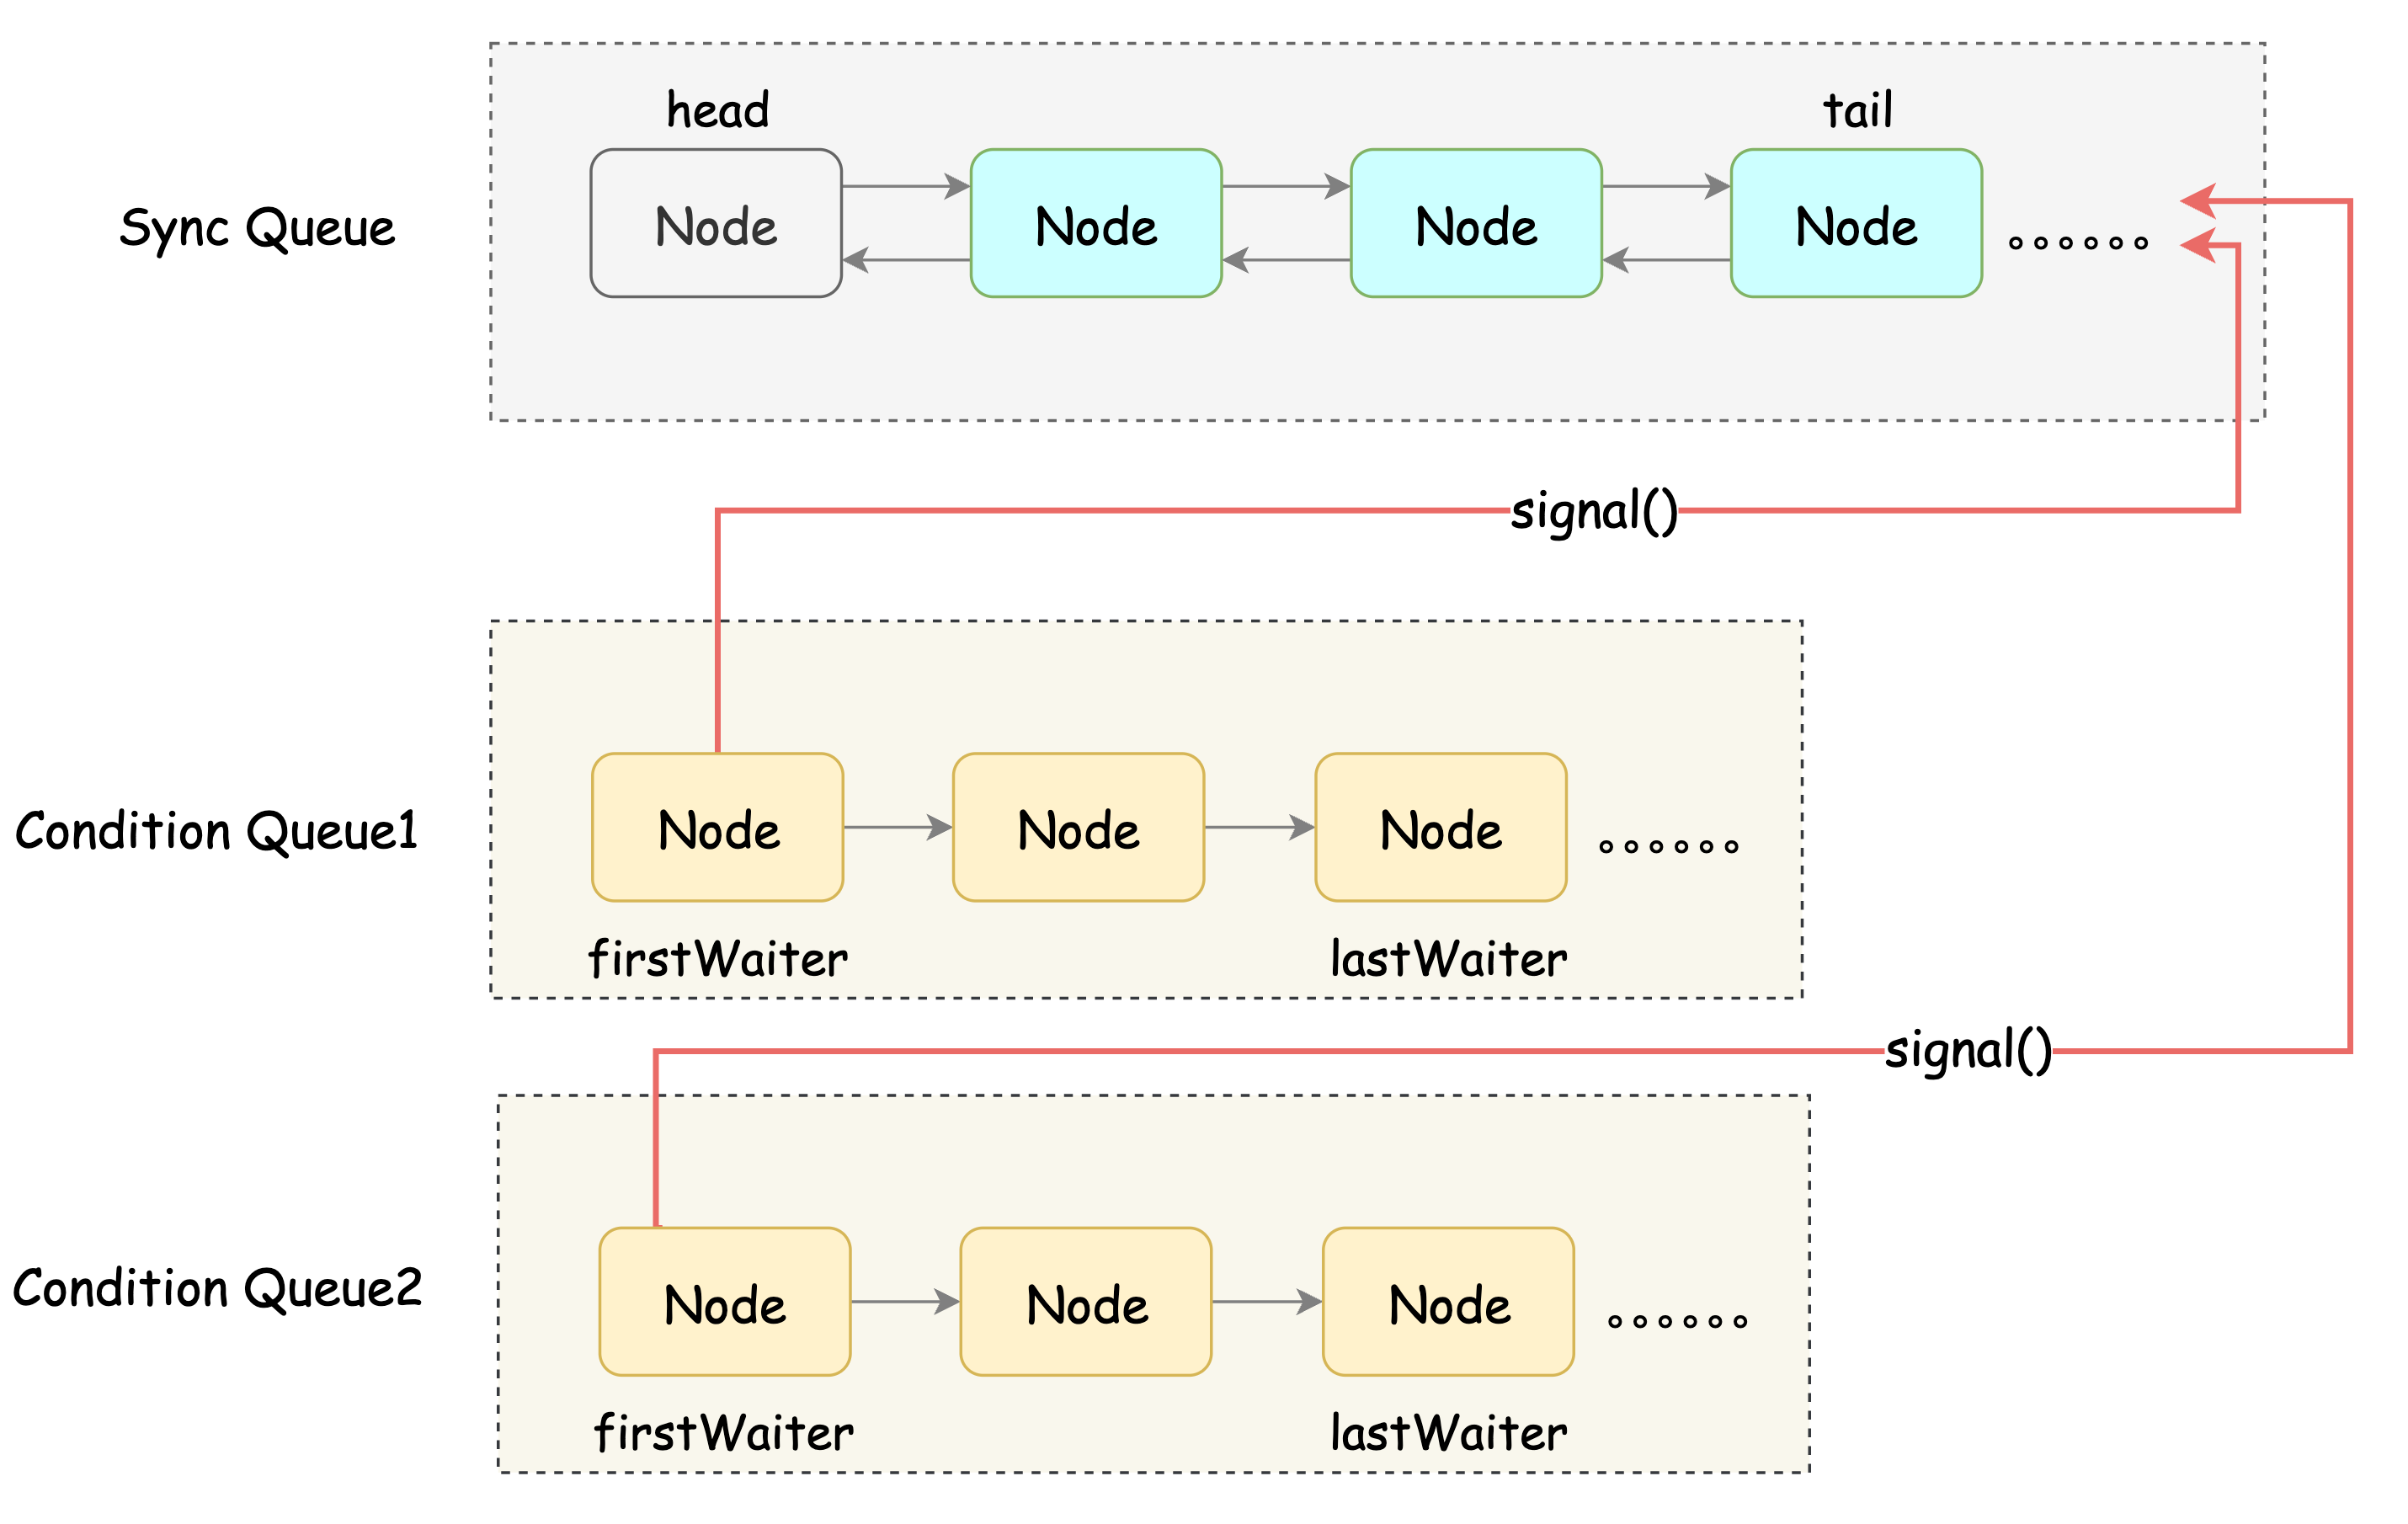
可知,ConditionObject实际上是维护了一个等待队列 。注意,要与前文中提到过的同步队列 区分开。其关系和原理如下图所示:
观察上图,其中同步队列和等待队列中的节点都是Node实例,因为当唤醒等待线程时,需要讲等待队列中的头节点转移到阻塞队列中的尾节点。newCondition()设置多个等待条件。await()后,会将其封装为一个Node并添加到相应的等待队列中,然后阻塞住,直到其他线程唤醒,即signal()时,再将firstWaiter节点转移到同步队列的尾部等待锁,当其获取到锁后,wait()方法便可以返回,往下执行。
2.2 Await() 1 2 3 4 5 6 7 8 9 10 11 12 13 14 15 16 17 18 19 20 21 22 23 24 25 26 27 28 29 30 31 32 33 34 public final void await () throws InterruptedException { if (Thread.interrupted()) throw new InterruptedException (); Node node = addConditionWaiter(); int savedState = fullyRelease(node); int interruptMode = 0 ; while (!isOnSyncQueue(node)) { LockSupport.park(this ); if ((interruptMode = checkInterruptWhileWaiting(node)) != 0 ) break ; } if (acquireQueued(node, savedState) && interruptMode != THROW_IE) interruptMode = REINTERRUPT; if (node.nextWaiter != null ) unlinkCancelledWaiters(); if (interruptMode != 0 ) reportInterruptAfterWait(interruptMode); }
2.3 将节点加入到等待队列 1 2 3 4 5 6 7 8 9 10 11 12 13 14 15 16 17 18 19 20 21 private Node addConditionWaiter () { Node t = lastWaiter; if (t != null && t.waitStatus != Node.CONDITION) { unlinkCancelledWaiters(); t = lastWaiter; } Node node = new Node (Thread.currentThread(), Node.CONDITION); if (t == null ) firstWaiter = node; else t.nextWaiter = node; lastWaiter = node; return node; }
以上代码很容易理解,总的流程就是将当前的线程入队到等待队列的队尾。其中unlinkCancelledWaiters()是用于清楚所有已经取消的线程。当 await 的时候如果发生了取消操作,或者是在节点入队的时候,发现最后一个节点是被取消的,会调用一次这个方法。
1 2 3 4 5 6 7 8 9 10 11 12 13 14 15 16 17 18 19 20 21 22 23 private void unlinkCancelledWaiters () { Node t = firstWaiter; Node trail = null ; while (t != null ) { Node next = t.nextWaiter; if (t.waitStatus != Node.CONDITION) { t.nextWaiter = null ; if (trail == null ) firstWaiter = next; else trail.nextWaiter = next; if (next == null ) lastWaiter = trail; } else trail = t; t = next; } }
2.4 完全释放独占锁—fullyRelease(node) 回顾await()方法中,将节点加入等待队列后,会将锁释放掉且保存锁的状态。
1 2 3 4 5 6 7 8 9 10 11 12 13 14 15 16 17 18 19 20 21 22 23 24 25 26 27 28 29 30 31 32 33 34 35 36 37 38 39 40 final int fullyRelease (Node node) { boolean failed = true ; try { int savedState = getState(); if (release(savedState)) { failed = false ; return savedState; } else { throw new IllegalMonitorStateException (); } } finally { if (failed) node.waitStatus = Node.CANCELLED; } } @ReservedStackAccess public final boolean release (int arg) { if (tryRelease(arg)) { Node h = head; if (h != null && h.waitStatus != 0 ) unparkSuccessor(h); return true ; } return false ; } @ReservedStackAccess protected final boolean tryRelease (int releases) { int c = getState() - releases; if (Thread.currentThread() != getExclusiveOwnerThread()) throw new IllegalMonitorStateException (); boolean free = false ; if (c == 0 ) { free = true ; setExclusiveOwnerThread(null ); } setState(c); return free; }
以上代码大部分在上一篇中已经讨论过,因此不再赘述。整体逻辑就是将其锁彻底释放。如果在解锁期间出现异常,则将此节点置为CANCELLED状态。
比如,已知要执行await()必须先持有锁。那么现在假设没有持有锁会出现什么问题? 从代码中可以看出,如果没持有锁,确实会生成Node对象并加入等待队列,但是在释放锁的时候,走到tryRelease()方法的时候,会检查当前线程是否持有锁,如果没持有锁,则会抛出异常,那么在fullyRelease()方法中执行到finally块的时候,会将此Node置为CANCELLED状态。然后在下一个Node入等待队列的时候会使用前面提到的unlinkCancelledWaiters()方法将其清理出去。
2.5 自旋等待进入同步队列 完全释放锁后,会进入以下代码:
1 2 3 4 5 6 7 8 9 int interruptMode = 0 ; while (!isOnSyncQueue(node)) { LockSupport.park(this ); if ((interruptMode = checkInterruptWhileWaiting(node)) != 0 ) break ; }
isOnSyncQueue(node)用于判断node节点是否在同步队列上。
1 2 3 4 5 6 7 8 9 10 11 12 13 14 15 16 17 18 19 20 21 22 23 24 25 26 final boolean isOnSyncQueue (Node node) { if (node.waitStatus == Node.CONDITION || node.prev == null ) return false ; if (node.next != null ) return true ; return findNodeFromTail(node); } private boolean findNodeFromTail (Node node) { Node t = tail; for (;;) { if (t == node) return true ; if (t == null ) return false ; t = t.prev; } }
在这段代码之前,就是await()后发生的事了,只要没有中断或者唤醒,那么这个线程就会被挂起在这个部分LockSupport.park(this)。接下来我们看唤醒部分。
2.6 唤醒线程 1 2 3 4 5 6 7 8 9 10 11 12 13 14 15 16 17 18 19 20 21 22 23 24 25 26 27 28 29 30 31 32 33 34 35 36 37 38 39 40 41 public final void signal () { if (!isHeldExclusively()) throw new IllegalMonitorStateException (); Node first = firstWaiter; if (first != null ) doSignal(first); } private void doSignal (Node first) { do { if ( (firstWaiter = first.nextWaiter) == null ) lastWaiter = null ; first.nextWaiter = null ; } while (!transferForSignal(first) && (first = firstWaiter) != null ); } final boolean transferForSignal (Node node) { if (!compareAndSetWaitStatus(node, Node.CONDITION, 0 )) return false ; Node p = enq(node); int ws = p.waitStatus; if (ws > 0 || !compareAndSetWaitStatus(p, ws, Node.SIGNAL)) LockSupport.unpark(node.thread); return true ; }
2.7 唤醒后,检查中断状态 现在唤醒的流程走完了,接下来我们再回到等待的流程中。上文中,已知被阻塞,现在唤醒后。继续向下执行。
1 2 3 4 5 6 7 8 9 10 11 12 13 14 15 16 17 18 19 20 21 22 23 24 25 26 27 28 29 30 31 32 33 34 35 36 37 38 39 40 41 42 43 44 45 46 47 48 49 public final void await () throws InterruptedException { if (Thread.interrupted()) throw new InterruptedException (); Node node = addConditionWaiter(); int savedState = fullyRelease(node); int interruptMode = 0 ; while (!isOnSyncQueue(node)) { LockSupport.park(this ); if ((interruptMode = checkInterruptWhileWaiting(node)) != 0 ) break ; } if (acquireQueued(node, savedState) && interruptMode != THROW_IE) interruptMode = REINTERRUPT; if (node.nextWaiter != null ) unlinkCancelledWaiters(); if (interruptMode != 0 ) reportInterruptAfterWait(interruptMode); } private int checkInterruptWhileWaiting (Node node) { return Thread.interrupted() ? (transferAfterCancelledWait(node) ? THROW_IE : REINTERRUPT) : 0 ; } final boolean transferAfterCancelledWait (Node node) { if (compareAndSetWaitStatus(node, Node.CONDITION, 0 )) { enq(node); return true ; } while (!isOnSyncQueue(node)) Thread.yield (); return false ; }
根据以上代码的分析,可知在唤醒之后,会判断其中断状态,如果中断了的话,需要判断其是在signal()之前还是之后中断的。如果是中断之前,则interruptMode置为THROW_IE(-1),否则置为REINTERRUPT(1)。
要注意的是,即使中断了等待,依然会进入同步队列。
2.8 检查中断状态后,获取独占锁 1 2 3 4 5 6 7 if (acquireQueued(node, savedState) && interruptMode != THROW_IE) interruptMode = REINTERRUPT;
继续:
1 2 3 4 5 6 if (node.nextWaiter != null ) unlinkCancelledWaiters(); if (interruptMode != 0 ) reportInterruptAfterWait(interruptMode);
注意,这里的if (node.nextWaiter != null)情况是什么时候满足的呢?前面我们看到signal()之后的操作,在节点转移到同步队列的时候会将其nextWaiter置为null。但是如果是在signal之前中断的话,那么就不会有这一步,而是直接在后面进入同步队列。此时的nextWaiter可能不为空。
2.9 处理中断 接下来就是根据中断类型来做后续的处理了。
1 2 3 4 5 6 7 8 9 10 if (interruptMode != 0 ) reportInterruptAfterWait(interruptMode); private void reportInterruptAfterWait (int interruptMode) throws InterruptedException { if (interruptMode == THROW_IE) throw new InterruptedException (); else if (interruptMode == REINTERRUPT) selfInterrupt(); }
这部分代码较简单,不再赘述。
2.10 带超时时间的await() 带超时时间的await()有好几种方法,但是原理都差不多,这里只拿一个举例。
1 2 3 4 5 6 7 8 9 10 11 12 13 14 15 16 17 18 19 20 21 22 23 24 25 26 27 28 29 30 31 32 33 34 35 36 37 38 39 40 41 42 43 44 45 46 47 48 49 50 51 52 public final long awaitNanos (long nanosTimeout) throws InterruptedException { if (Thread.interrupted()) throw new InterruptedException (); Node node = addConditionWaiter(); int savedState = fullyRelease(node); final long deadline = System.nanoTime() + nanosTimeout; int interruptMode = 0 ; while (!isOnSyncQueue(node)) { if (nanosTimeout <= 0L ) { transferAfterCancelledWait(node); break ; } if (nanosTimeout >= spinForTimeoutThreshold) LockSupport.parkNanos(this , nanosTimeout); if ((interruptMode = checkInterruptWhileWaiting(node)) != 0 ) break ; nanosTimeout = deadline - System.nanoTime(); } if (acquireQueued(node, savedState) && interruptMode != THROW_IE) interruptMode = REINTERRUPT; if (node.nextWaiter != null ) unlinkCancelledWaiters(); if (interruptMode != 0 ) reportInterruptAfterWait(interruptMode); return deadline - System.nanoTime(); } final boolean transferAfterCancelledWait (Node node) { if (compareAndSetWaitStatus(node, Node.CONDITION, 0 )) { enq(node); return true ; } while (!isOnSyncQueue(node)) Thread.yield (); return false ; }
超时的思路还是很简单的,不带超时参数的 await 是 park,然后等待别人唤醒。而现在就是调用 parkNanos 方法来休眠指定的时间,醒来后判断是否 signal 调用了,调用了就是没有超时,否则就是超时了。超时的话,自己来进行转移到阻塞队列,然后抢锁。